

I’m all about making the most of the week. I may have a 9- 5 week day job, but that doesn’t mean I’m reserving all my energy to be a weekend warrior. We like to bike and climb on weekday evenings to make the week less about working and more about living.
But let me tell you about my most recent weekday adventure….
Because we have been so invested in biking and climbing lately, we haven’t taken the time to hike somewhere that wasn’t to a crag. But when my friends invited me on a “small scramble” to Mount Superior, I had to jump on it because I miss hiking to summits for the view, the workout, and the time catching up with my pals.
Don’t get me wrong… I love seeing the view at the top of a climbing route, but it’s usually about the act of climbing rather than the view.
And biking down a single track is thrilling, but sometimes you want something mellow with your feet grounded (plus, we had a ladies’ ride the night before).
But let me tell ya… just because I say this was a hike, does not mean it was mellow!
It was honestly a mix between hike, scramble, and a little bit of free climbing on exposed cliffs.
And it did not disappoint.
Please note that we went clockwise in a loop starting on the technical route to Mount Superior.
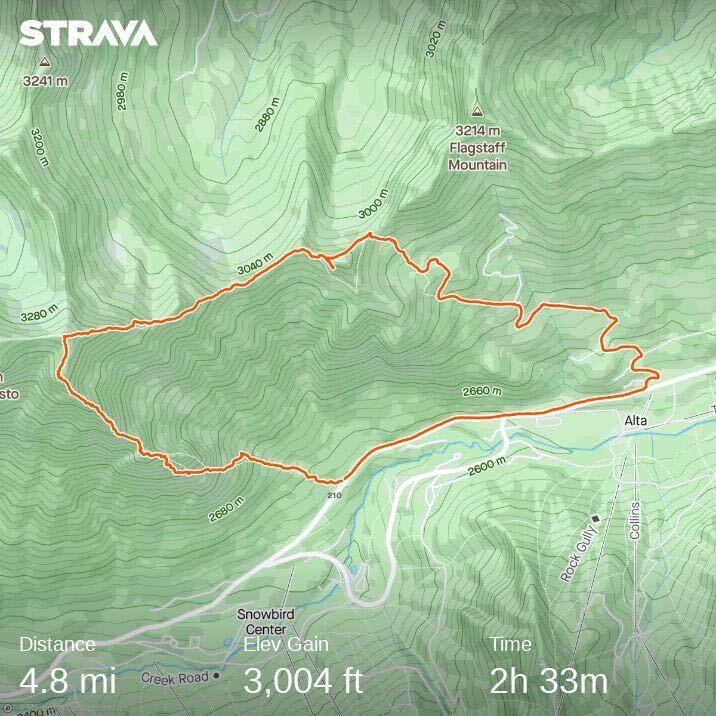
Starting Point
The hike started off Highway 210 up Little Cottonwood Canyon. We parked on the north side of the road just before Hellgate Road by Snowbird Resort. There was a clearly marked trail that quickly dissipated into a rock field. Before the rock got too steep for us to climb up, we took a left turn to head up the ridge towards the summit.
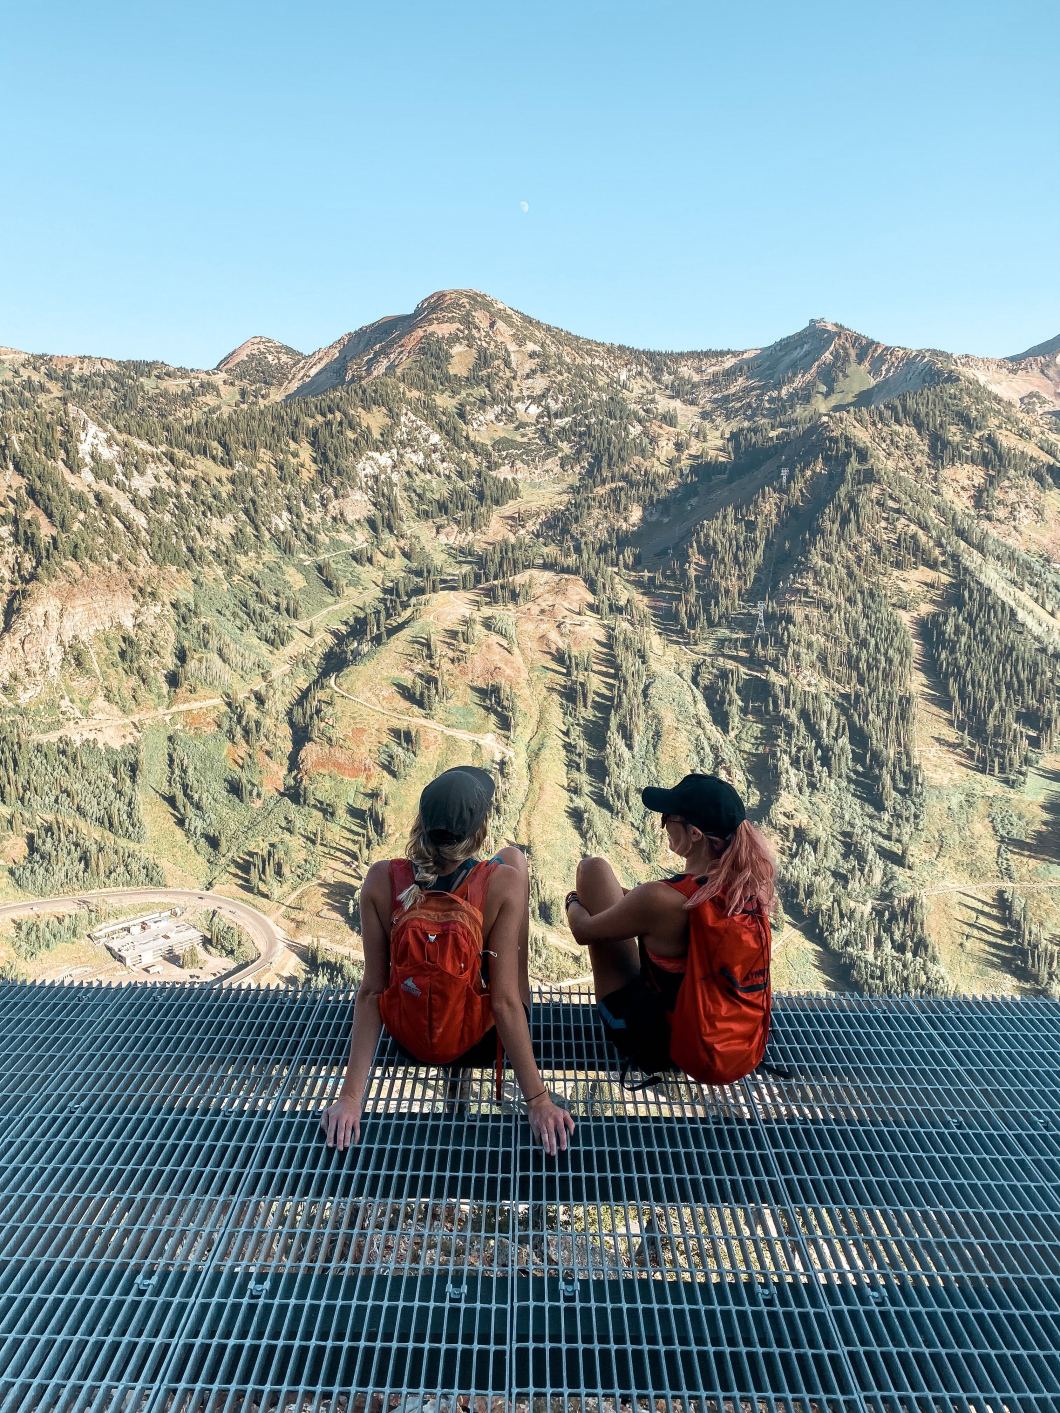
We were able to chat with another group that was taking the technical route as well, and we matched up with a small scramble trail. We passed a couple drainage pipes and a sweet metal platform as we headed up the ridge.
Scrambling/ Climbing Things That Looked Harder Than They Actually Were (But Still Very Nerve Wracking)
We took a small break at the platform, and started back up at the ridge towards Suicide Chute, which is a popular apres season hikeable ski chute.
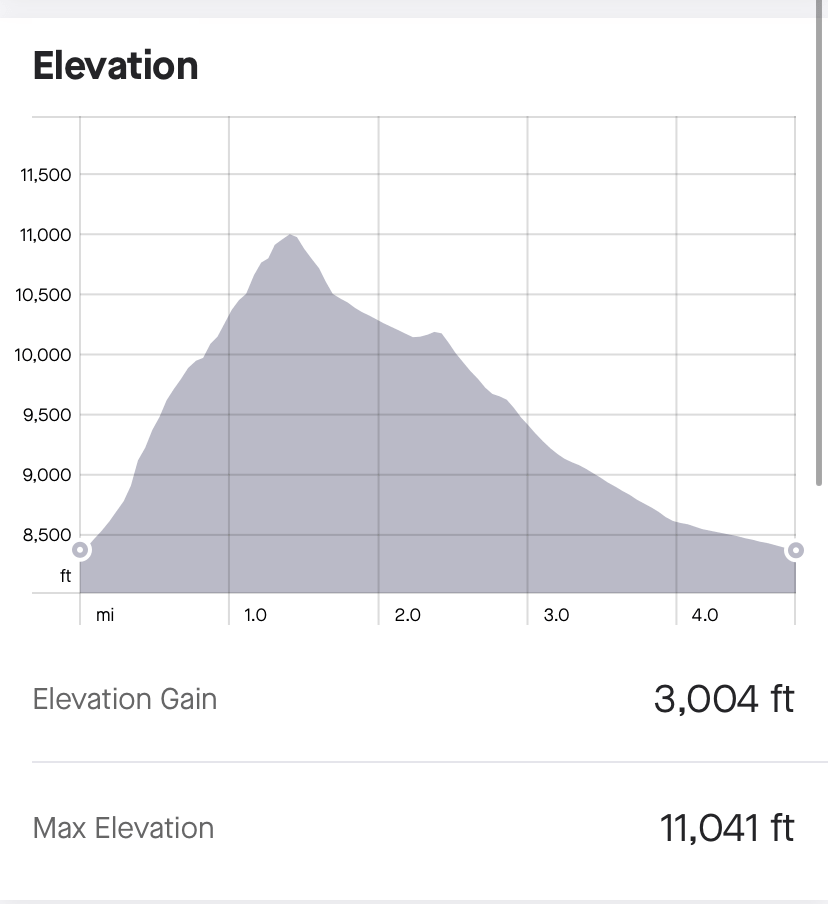
At that point, we were probably about 1/3 way up the mountain. And we had gained over 1,000 feet of elevation from the starting point on the road.
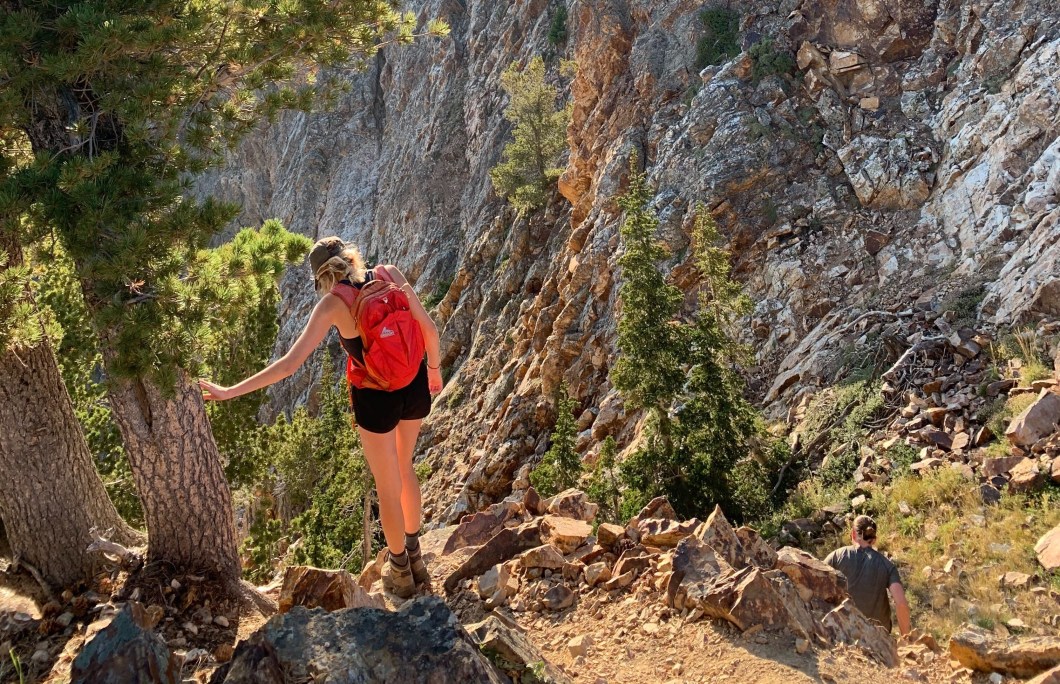
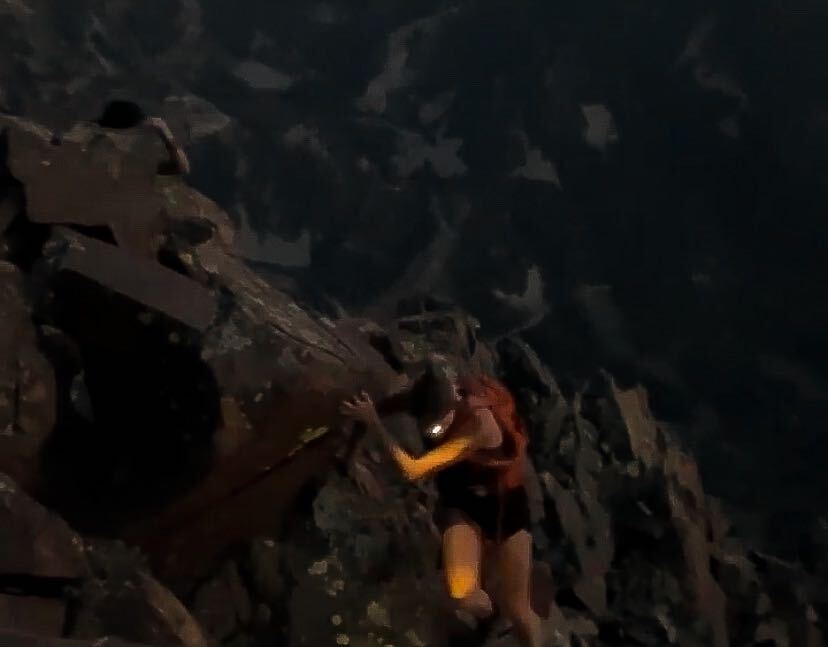
It was around 7:30pm with an hour left of daylight, but we continued up towards the summit. Looking ahead, the “trail” was very steep. We had to climb up multiple faces, but luckily, the rock had very good handholds and very grippy.
There were a variety of spines, steep scrambles, and loose rock. We moved slow and steady to ensure that we did not start rock slides, as well as to confirm that we were placing our hands and feet in sturdy spots before practically doing big stair steps and one-legged pistil squats up a ridge.

This technical scramble was not for the faint of heart due to the exposure and intense incline. However, I noticed that the pitch looked harder from further away. Certain paths looked like the incorrect way, but in reality, when we came up to it, it had good handholds and good shelves to boost up on.
Climbing techniques were extremely helpful, such as using your legs, as well as reaching for quality handholds (which were plentiful).
While the handholds were promising, one thing that was very discouraging were the false summits. Because the grade of the hike, false summits also seemed to be infinite.
And it didn’t help that we were watching the shadows get longer and longer. We had a temporary freak out asking ourselves “what the hell did we get into”, but we were able to collect ourselves and kept pushing on knowing that the trail down would be way more less technical and way more mellow than what we just came up.

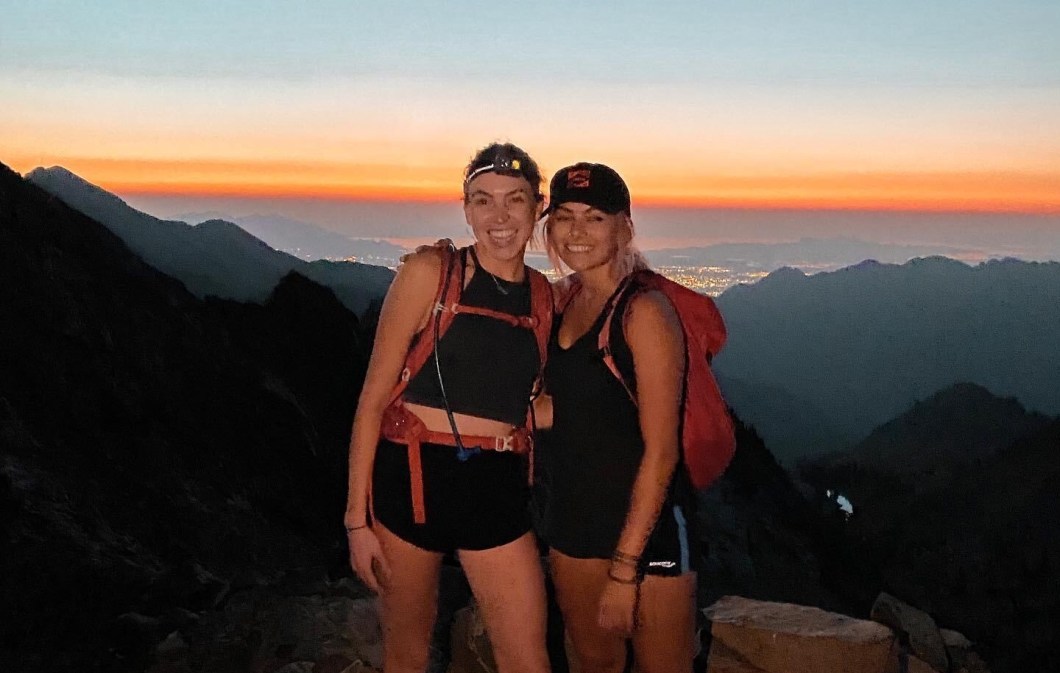
The Summit
Luckily, we met up with the group from the bottom, and we were able to traverse to the summit. The last bit of the dusk sunlight was just disappearing, and we had a nighttime view of Salt Lake City’s twinkling lights down in the valley. We had a panorama of mountain silhouettes, including the top of the Snowbird Tram straight to the south. We snapped some pictures at the top using phone flashlights as impromptu lighting, then decided to head down so we could get home before midnight.
Hike Down In The Dark
The hike down was not as steep, which meant that we added way more mileage to our Thursday hike. But it also was so nice to not have to scale a ridge by the light of our phone lights. It was also pretty much all downhill and well marked, so we were able to just put our heads down and make our way to the road.
The trail wandered on the backside of the ridge, which was a little unnerving because we didn’t see the lights of the civilization in Little Cottonwood. Only the lights of our phones, as well as the moonlight reflecting on the stark white rocks.
We made the most of the night hike and shut our lights off a couple times to see the stars and march along the trail by the light of the moon.
The hike down was still very much exposed, but because it was dark, I didn’t notice it as much. I focused on where my feet were going rather than the rocky drop offs next to us.
The trail got less and less steep, and it put us out on a dirt road, which turned into a paved road next to some alpine condos. We had to hike along the highway in the dark back to the parking spot, but it was a lot less stressful hiking the road at 10 pm than trying to navigate down the boulder field where we had started.
The trail we took down to the car is an alternate out and back route to the summit if you do not want to take the technical scramble loop.
Scramble Suggestions
If starting in the later afternoon, bring a headlamp to get you through the whole loop. Thank goodness for phones and phone lights that operate on low battery.
Additionally, we did have service on this trail, but it is still smart to download the trail map on an app or Google Maps to check frequently, especially towards the beginning, as well as on the traverse after the summit.
While I had on sturdy hiking shoes that worked very well with the grippy rock, if you have approach shoes, I would highly suggest them as a footwear choice. There are definitely rock climbing moments that could be a little less sketch if you have secure clingy footwear like approach shoes.
In addition to shoes, it would also help to bring safety gear like knee protection or helmets to be safe while summiting.
I personally would like to summit more mountains in the area, but instead of doing an 5 pm – 10 pm hike, make it into a 5am to 10 am hike. A sunrise in this area would be just as pretty as sunset, and it would allow for us to take our time rather than racing against the sun.
Thanks for reading, and I hope this makes you want to summit Mount Superior, whether it be from the the trail or the scramble (but maybe just be a little more prepared)
If you would like a different perspective about our hike, head to Pete’s Instagram for his account.
Your nacforadventurer, dusk scrambler, and moonlight hiker,
AJ
